This is a short description explaining how to install the Afterburner040 in
the Falcon030.
The actuall installing isn't as bad as it first can look. In fact, it's
rather easy and anyone should be capable of doing it if he follows the
instructions in the supplied documentation or looking at the info found on these
pages.
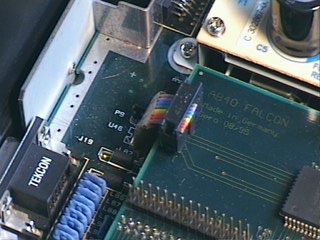
To the right you can see the "interresting" part of the Falcon030 motherboard
and where all installations and modifications are made.
You might also need to do the "buffer mod" if you
havn't done it already.
The only thing that is a bit "swetty" is when you have to lift two legs on the
old CPU. But as those two legs are leg 16 and 17 it isn't very hard as they are
in the lower left corner of the 030.
So how do I do it?
Well, you must first be sure that you have got the buffer mod done. All falcons
from C-Lab should have these made already but some older falcon's wont have it.
It's easy to see if it has been done or not as the three resistors in the picture above
marked R216, R221 and R222 should have been removed and some wires being
added. You can get more info on how to do the buffer mod clicking here:
buffer mod
What should I do after the buffer mod?
When you are sure that you have got a buffer mod and it's working properly, it's time
for the next step.
Now are you going to lift the two pins on the CPU (030). It's pin 16 and 17 located
in the lower left corner. Be very carful when you do this as the legs are very
thin and could brake easily if you are not careful. Don't bend them much, just enough
to clear them from the pcb (motherboard).
When this is done, use a thin flexible wire and connect pin 17 on the 030 to ground.
An easy place is to use pin 10 on U62.
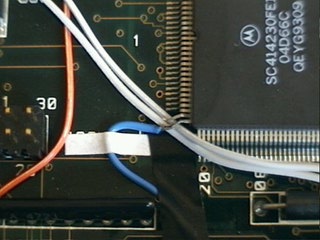
After this you connect the 8 wires from the the flatcable comming from the Afterburner040
it self. This is very easy.
But first..
Before you do anything, make sure that you know how the pins on different components
are numbered. Study these two components and memorise them. If you manage to connect
any wire wrong, don't worry as the chance that you have destroyed anything is very small.
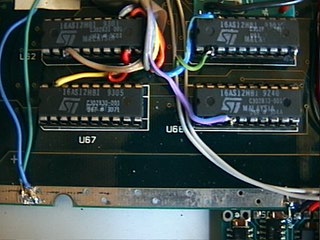
20-pin component
U62, U63, U67, U68 there the 8 wires from the Afterburner040 goes all have 20-pinns
each.
68030 component
This is the big component to the left on the picture above.
Some more pictures to help
If you want some more help you can dowload these pictures. They will show you how
the installation looks like in more detail. Note that these pictures are from
a Falcon with a Nemesis fitted, so they may differ a bit (eg. more wires then
you should have).


If you have any problems viewing these pages, or have any other queries
regarding the information presented here, please contact.
(email:Magnus.Kollberg@emw.ericsson.se)